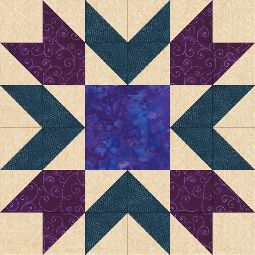
 This week I'm working on a large center block for my sampler quilt. This block works well as a 12" or 18" block, so I have provided the Accuquilt Go! dies for both. The patch quantities are for one block, so depending upon your final quilt size you can easily figure out the total patches needed. AccuQuilt GO! Dies and rotary cutting instructions are provided.
Fabric A - Blue
Fabric B - Purple
Fabric C - Tan
Fabric D - Green
Cut 1 Fabric A Square - GO! Square 4 1/2" 55060 or Value Die 55018
Cut 4 Fabric B Squares - Go! Square 2 1/2" 55059 or Value Die 55018 You can also use the Strip Cutter 2 1/2" die, 55014 or 55017 by cutting 2 1/2" strips then rotate the strips 90°, then cut again for 2 1/2" squares.
Cut 4 Fabric C Squares - Go! Square 2 1/2" 55059 or Value Die 55018 You can also use the Strip Cutter 2 1/2" die, 55014 or 55017 by cutting 2 1/2" strips then rotate the strips 90°, then cut again for 2 1/2" squares.
Cut 8 Fabric B Triangles - Go! Half Square 2" Finished Triangles: Die 55063 or Value Die 55018
Cut 16 Fabric D Triangles - Go! Half Square 2" Finished Triangles: Die 55063 or Value Die 55018
Cut 24 Fabric C Triangles - Go! Half Square 2" Finished Triangles: Die 55063 or Value Die 55018
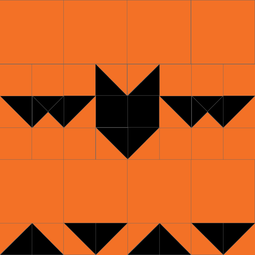
 Just in time for Halloween, here is a fun little bat quilt block for you to enjoy. Halloween is one of my favorite holidays so I just had to make a special block design for it! Happy Halloween!
Fabric A - Orange
Fabric B - Black
Cut 2 - 1 1/2" quarter square triangles from Fabric A - 2 1/4" squares are needed so use GO! Strip Cutter-2 1/4" (55053), then rotate 90° and cut them again on the same 2 1/4" strip cutter or use a rotary cutter to sub cut squares. Then sub cut the squares into quarter square triangles.
Cut 6 - 1 1/2" quarter square triangles from Fabric B - 2 1/4" squares are needed so use GO! Strip Cutter-2 1/4" (55053), then rotate 90° and cut them again on the same 2 1/4" strip cutter or use a rotary cutter to sub cut squares. Then sub cut the squares into quarter square triangles.
Cut 16 - 1 1/2" half square triangles from Fabric A - Use the GO! Half Square-1" Finished Triangle (55320)
Cut 16 - 1 1/2" half square triangles from Fabric B - Use the GO! Half Square-1" Finished Triangle (55320)
Cut 8 - 2 1/2" squares from Fabric A - Use the GO! Square-2 1/2" Multiples (55059); or GO! Value Die (55018); or create them by cutting 2 1/2" strips with the GO! Strip Cutter-2 1/2" (55014 or 55017), and then rotate the strips 90° and cut them again on the same 2 1/2" strip cutter or use a rotary cutter to sub cut squares.
Cut 2 - 1 1/2" squares from Fabric B - Use the GO! Strip Cutter-1 1/2" (55024), then rotate 90° and cut them again on the same 1 1/2" strip cutter or use a rotary cutter to sub cut squares.
Cut 12 - 1 1/2" squares from Fabric A - Use the GO! Strip Cutter-1 1/2" (55024), then rotate 90° and cut them again on the same 1 1/2" strip cutter or use a rotary cutter to sub cut squares.
We enjoyed the many wonderful quilts at the 2012 Alaska State Fair this year, along with an assortment of Fair food. There were traditional patterns as well as modern quilts and appliqué. We wanted to give you a peak at some of the many beautiful examples to both inspire and encourage your own creativity. Click on one of the quilts for a larger view.
The nights are getting cooler here in Alaska. The Birch trees have a hint of yellow and our thoughts are turning towards Fall. We really don't mind the approach of winter as we've spent a wonderful summer gardening and the winter means more time to quilt.

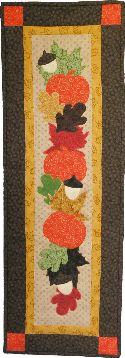
 We welcomed the approaching season by making a Fall wall hanging, bringing some of the Autumn colors inside. We used the Accuquilt GO! Fall Medley die and the GO! Fall Frolic Skinny Wall Hanging pattern that came with the die. We couldn't help personalizing the pattern by adding to this great project and coming up with our own creations. While we used a lot of the same fabrics, we each chose different directions for our final design.
The GO! Fall Medley die cuts one maple leaf, oak leaf, pumpkin and an acorn and cap. We arranged the appliqué according to the pattern, then fused the shapes onto a 6 1/2" x 30 1/2" light brown fabric. We wanted the wall hangings to be wider so we decided to add borders. After all of this we split up to work separately on our individual designs.
Jessica: First thing I did next was to secure my applique, I used a decorative stitch around all my leaves, pumpkins, and acorns. I tested several stitches on my machine, on a separate piece of scrap cloth, before finding my favorite, which resembles a lightening bolt. Next, I added 1 1/2" of orange sashing at the top and bottom and then a 2 1/2" dark brown border all around. I added half square finished triangle cornerstones to create the illusion that the orange pieces were threaded through the top and bottom of the wall hanging.
Julie: I chose three different stitches for my appliqué, a satin stitch, blanket stitch and a decorative stitch that I don't have a name for, but resembles a combination of a satin and blanket stitch. I used these different stitches throughout my center design. Then to finish the top, I added gold 1 1/2" sashing all around, a 2 1/2" brown border and orange cornerstones. To cut the cornerstones I used the 2 1/2" square on the Value die, that is included with the GO!.
We quilted the wall hangings by sewing around each applique piece then stitching in the ditch to finish. We thought about doing more, but in the end, we decided to keep the quilting simple so that the applique could take center stage.
We had so much fun with this project and would love to hear your ideas for the Go! Fall Medley die in the comments below.
Fall Medley Die - 55041
1 1/2" Strip Cutter - 55024
2 1/2" Strip Cutter - 55017a
Value Die - 55018