Half square triangles are a basic quilt block unit so it is good to have some quick and accurate techniques to make them. Working with triangles can be tricky since one or more of the edges will be cut on the bias, which is a 45 degree angle to the fabric's crosswise and lengthwise grain. The bias edge will be very stretchy which could easily distort the shape.
Accurate cutting, an accurate scant 1/4" seam, starch, and some knowledge will help you with this shape.
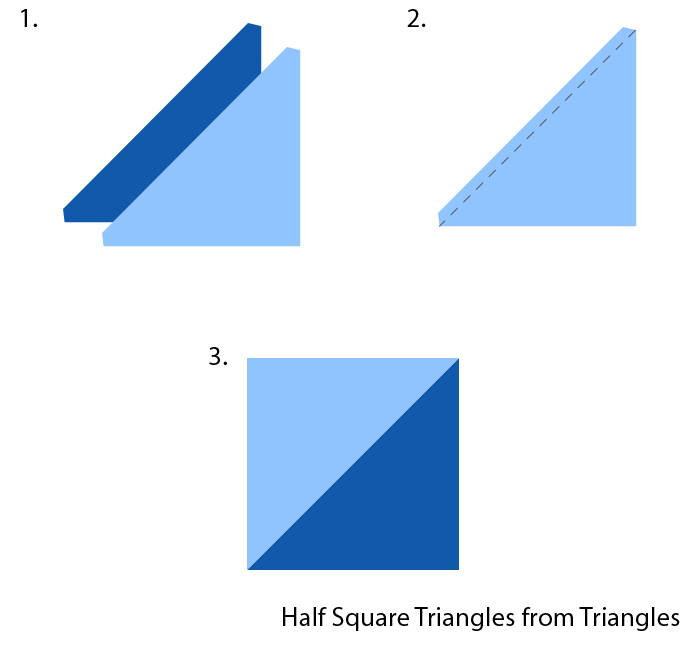
Method 1 - Using Triangles
There are many products on the market to help you cut accurate half square triangles including rulers, templates, and cutting machines. The ease of use varies with each product, for example, the AccuQuilt GO! will cut out perfect half square triangles with the corners already trimmed (dog-eared) so you don't have to deal with them later and you can line up the pieces for accurate sewing.
The AccuQuilt GO! is fast and efficient but you may not have the right size die available. Each die cuts only one size half square triangles and you many not want to own all of them or the specific size you need may not exist. In that case, using rulers and templates work well, but you will have to deal with the bias edge more because you'll be handling the fabric more.
1. Starch your fabric if desired. Choose your cutting method and cut out half square triangles in the size needed. Lay the two triangles right sides together.
2. Sew a scant 1/4" down the longest side.
3. Open to reveal your finished half square triangle. Finger press the seam allowance towards the darker side and repeat as needed.
Method 2 - Using Squares
If you don't want to deal with the exposed bias edge, you can make half square triangles out of squares. This method can be done with rotary cutting tools and templates or other AccuQuilt dies. You will also be making two half square triangles at a time so this method can be faster.
1. First take the finished size of the unit in the final block and add 7/8" to it. Cut out a square of each color needed matching that size. Stack the squares right sides together.
2. Then draw a line from corner to corner. Measure a scant 1/4" out from that line and mark your sewing lines on both sides.
3. Sew down both sewing lines and then cut down the middle with a rotary cutter.
4. Open your two complete half square triangles. Finger press the seam allowance towards the darker side and repeat as needed.

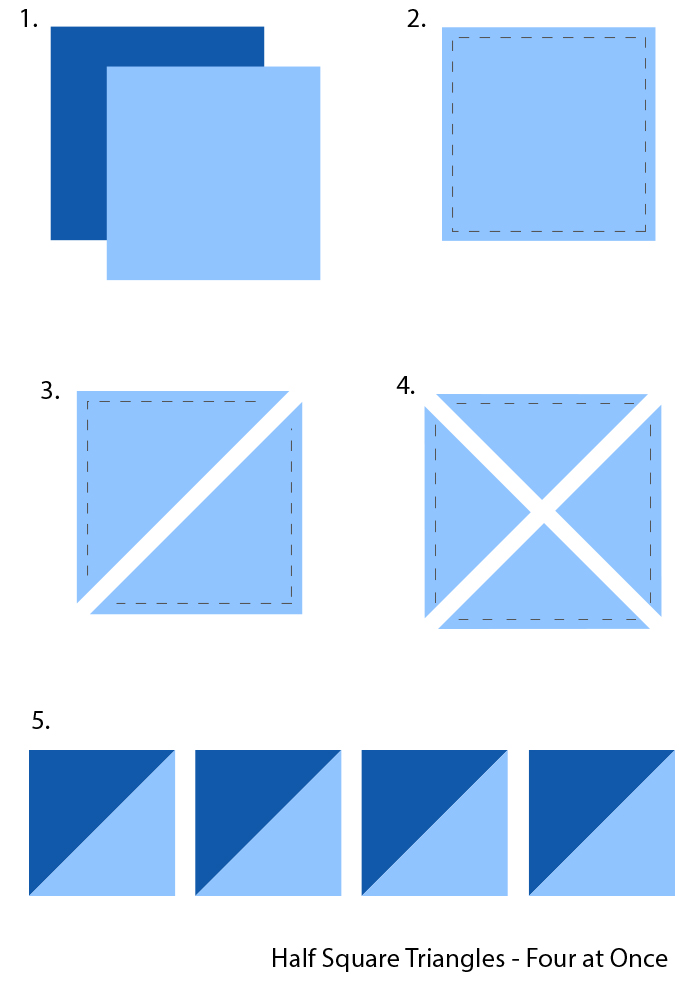
Method 3 - Four at Once
If making two at a time isn't fast enough for you, you can also make half square triangles four at a time with larger squares.
1. To get the size of the square needed, take the finished size of the unit, divide by 0.64, and then round up to an easy size to cut. For example, to make 3" half square triangles, you'll want two 5" squares. To double check your measurement, take the size of your square and multiply by 0.64. That will give you the half square triangle size you'll get before trimming. So once you decide on the square size needed, proceed to cut two squares in different colors and then stack the squares right sides together.
2. Stitch a scant 1/4" around the perimeter of the stacked squares.
3. Lay your ruler across the square from corner to corner and cut the square into two triangles.
4. Lay the ruler in the other direction, from corner to corner, and cut again. You should have four triangles now.
5. Open up your four half square triangles. Finger press the seam allowance towards the darker side, trim down to the size needed, and repeat.
Final Step for All Methods
No matter which method you use, your finished half square should be 1/2" bigger than the finished size needed. If your half square is too big, trim it down or if your half square is too small, double check the accuracy of your seam allowance.